

Showing posts with label Creative Memories. Show all posts
Showing posts with label Creative Memories. Show all posts
Tuesday, November 27, 2012
Day 332: Welcome Baby Card
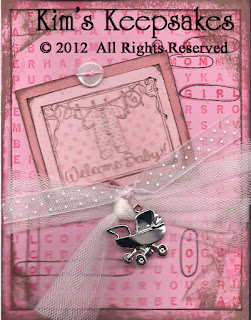
I found out that a friend had a beautiful baby girl tonight, so I had to make a card to include with my gift. I used card stock, inks, and stamps from Stampin' Up! (The rose colored card and dotted pink were in my stash, but they are not SU). I circled the words in the word background that applied to this baby with a journaling pen from Creative Memories. I tied white tulle and a sheer pink ribbon with white polka dots (both from my stash) around the word search, and added a Hallmark baby buggy charm to the ribbon with a pink safety pin from Oriental Trading Company. I used some Scrapper's Floss (Karen Foster) to "tie" on the pink button (my stash).


Friday, November 9, 2012
Day 314: Faith Book: "SPF 12 Following the Son" VBS Page
The kids at our church always make a photo frame that reflects the frame of VBS for the week. They get their photo taken and put it in the frame. I decided to use a lot of Creative Memories products on this page because they worked with the colors in the photo.


Thursday, September 13, 2012
Day 254:For This Child I Prayed
I used the pink version of Inspirational Memories' paper, "Let the little children come to me" (Matthew 19:14) as the background for this page about my daughter. I used a pinkish peach frame from Wild Asparagus, wrote a letter to my daughter and the Bible verse from 1 Samuel 1:27 onto Stampin' Up! paper, and then embellished the page with some butterflies that I fussy cut from paper by K and Co. The "sweet" and "special" tags were in my stash. Cross also from Jolee's. Journaling pen from Creative Memories.
Wednesday, September 12, 2012
Day 253: Precious Boy My Joy
The background paper for this page is from Inspirational Memories. I used a frame from Wild Asparagus, fussy cut images out of the bird paper from Stampin' Up! (SU), added the "precious, joy, heaven sent, blessing" stickers from my stash, and then added some mother of pearl buttons from my button box. I wrote my son a little letter on part of the SU paper, as well as the bible verse from 1 Samuel 1:27. The cross is from Jolee's. Journaling pen from Creative Memories.

Tuesday, September 4, 2012
Day 245: Dedication Page
Today I worked on my Dedication page. I wanted to dedicate my album to the Lord, and I have been trying to come up with the best way to do it. This paper was the reverse design of the paper I used for my Baptism page, and I thought it was pretty, and there was space on the right for me to journal this prayer to the Lord, so I decided to use it as the page background. It works out well because the Dedication page will be the first page in the album and the Baptism page will be the second page. The prayer was copied from Sharon Sheridan's book, Pages of Faith: The Art of Spiritual Scrapbooking, with a few modifications. I used a journaling pen from Creative Memories to write the prayer and the Bible verse from 1 Corinthians 10:31 along the stem of the branch supporting the upper bird. I underlined words I wanted to emphasize with gold Smooch paint by Hampton Arts . The "faith" embellishment is from Me and My Big Ideas.

Sunday, September 2, 2012
Day 243: Baptism Page

Wednesday, August 8, 2012
Day 220: Cards for Boys
My kids got invited to some birthday parties and I needed to make some boy cards. Tonight I used stickers from Karen Foster, yellow paper from Creative Memories, a background stamp from Great Impressions, ink from Stampin' Up!, and bits and pieces of leftover papers to create these 5 cute cards.


Sunday, August 5, 2012
Day 217: Happy Birthday with Yoda: A Happy Birthday You Must Have
My son wanted to have his photo taken with his Yoda toy for his birthday. I wanted to use Star Wars paper, but all I had was red or blue, and I really needed green because my son was wearing a green shirt, and Yoda is green. So, I just used some Simply Asparagus paper by My Mind's Eye as the background.
The quote I chose for this page is written the way Yoda speaks: "8 you are...A Happy Birthday You Must Have". I used a variety of letter fonts to make this quote, although I did try to stick to the same font for each word so it would be a little more uniform in style. This was inspired by Trudy Sigurdson's book, Embellished Emotions for Scrapbookers: Adding Your Personal Touch to Poems, Quotes, and Sayings.
I used my Copic Green Garden marker to color the number "8" (Paperbilities), the "Happy Birthday" plaque (Making Memories), and the chipboard letters in "Have" (unknown). The green "you" stickers are by Heidi Grace. All other letters and numbers were in my stash, manufacturers unknown. I added the Yoda sticker at the bottom of the quote, just like you might see a famous person's name after a quote. I punched a hexagon shape from green paper with my Creative Memories punch and used it to back the hexagon-shaped Star Wars sticker and placed that above the photo. I made a banner from chipboard pennant pieces by Jenni Bowlin. I colored the pennant shapes with my Copic marker and attached them to some sparkly green ribbon in my stash. I added three number 8s from my stash onto the pennants, and hung the banner in the upper left corner of the photo. Star Wars and Yoda stickers by Creative Imaginations. Journaling pen by Creative Memories.

The quote I chose for this page is written the way Yoda speaks: "8 you are...A Happy Birthday You Must Have". I used a variety of letter fonts to make this quote, although I did try to stick to the same font for each word so it would be a little more uniform in style. This was inspired by Trudy Sigurdson's book, Embellished Emotions for Scrapbookers: Adding Your Personal Touch to Poems, Quotes, and Sayings.
I used my Copic Green Garden marker to color the number "8" (Paperbilities), the "Happy Birthday" plaque (Making Memories), and the chipboard letters in "Have" (unknown). The green "you" stickers are by Heidi Grace. All other letters and numbers were in my stash, manufacturers unknown. I added the Yoda sticker at the bottom of the quote, just like you might see a famous person's name after a quote. I punched a hexagon shape from green paper with my Creative Memories punch and used it to back the hexagon-shaped Star Wars sticker and placed that above the photo. I made a banner from chipboard pennant pieces by Jenni Bowlin. I colored the pennant shapes with my Copic marker and attached them to some sparkly green ribbon in my stash. I added three number 8s from my stash onto the pennants, and hung the banner in the upper left corner of the photo. Star Wars and Yoda stickers by Creative Imaginations. Journaling pen by Creative Memories.

Tuesday, July 31, 2012
Day 212: #1 Soccer Player
Tonight I worked on 2 soccer pages for my son.
For the left page, I used a soccer background from Bella Blvd, the big round soccer ball paper from Reminisce, chipboard embellishments "soccer" and "#1" from Little Yellow Bicycle, and soccer ball stickers from Karen Foster Designs. I think it is pretty self-explanatory how this page went together, so I won't give details about what I did.
For the right page, I used a soccer collage paper from Little Yellow Bicycle as the background. I selected 3 photos of my son and cropped them to fit inside the postage stamp frames (die and Big Shot machine by Sizzix; black card stock by Stampin' Up!). In the center of the two larger photos, I added a "soccer champ" sticker by Karen Foster. I used my date stamp from Office Max to stamp the month and year around the cluster of photos. I used three epoxy soccer stickers from EK Success to add a triangle shape to the paper that helps to keep the eye moving across the page. I added some info about the team, coach, etc., to the words at the bottom of the page with a journaling pen from Creative Memories. Finally, I added my son's "soccer card" photo to the bottom right of the page and tucked another soccer ball sticker under the left side of the picture, further adding to the collage effect.

For the left page, I used a soccer background from Bella Blvd, the big round soccer ball paper from Reminisce, chipboard embellishments "soccer" and "#1" from Little Yellow Bicycle, and soccer ball stickers from Karen Foster Designs. I think it is pretty self-explanatory how this page went together, so I won't give details about what I did.
For the right page, I used a soccer collage paper from Little Yellow Bicycle as the background. I selected 3 photos of my son and cropped them to fit inside the postage stamp frames (die and Big Shot machine by Sizzix; black card stock by Stampin' Up!). In the center of the two larger photos, I added a "soccer champ" sticker by Karen Foster. I used my date stamp from Office Max to stamp the month and year around the cluster of photos. I used three epoxy soccer stickers from EK Success to add a triangle shape to the paper that helps to keep the eye moving across the page. I added some info about the team, coach, etc., to the words at the bottom of the page with a journaling pen from Creative Memories. Finally, I added my son's "soccer card" photo to the bottom right of the page and tucked another soccer ball sticker under the left side of the picture, further adding to the collage effect.

Thursday, July 19, 2012
Day 200: Future Football Star Scrapbook Page
I always get my kids' photos taken at Sears Portrait Studios. They always do a really nice job on them! My son really wanted to take a photo with him catching the football. The photographer managed to get the shot, then converted the photo to black and white, added two small color insets of other photos, and then did this great title "Future Football Star" and my son's name in an orange font with a royal blue shadow. Orange is my son's favorite color, and the royal blue matched his shirt. In order to keep most of the focus on the photo collage, I used a "varsity" numbers background paper from Jillibean. I added two title strips from Creative Memories to make help emphasize the royal blue and orange font on the photo collage. Then I added two arrows (Little Yellow Bicycle) pointing up, to help draw the eye up to the football in the photo.


Monday, June 18, 2012
Day 169: 3 Cute Cousins
I selected this red, orange, and green background paper from my stash (unknown) because it pulled out so many colors from the kids' clothes. I used a green title strip from Creative Memories across the top of the page. Then I layered the green-matted number 3 (Making Memories) onto a brown chipboard tag (Bo Bunny) and then added some brown chipboard scrolls (also Bo Bunny) on either side. I matted the number 3, and the "cute" and "cousins" tags (My Mind's Eye) with the Creative Memories paper, and then added brown chipboard swirls from Bo Bunny on top of the words. Green photo corners cut from more Creative Memories paper and green brads from Bo Bunny complete the page.

Tuesday, March 27, 2012
Day 87: Playing with Paint
I needed to scrap my son's school kindergarten photo, but to coordinate with the next page, I couldn't use the typical primary colors. I went through my stash of papers and found "Khaki Plaid" by Kelly Panacci for Sandylion. It is a blue and green plaid, set on the diagonal. One of the shades of blue looked good with the shirt my son was wearing, and the paper coordinated with the grandmother and grandson page I completed a couple of days ago. But how to make the page look "school-ish"? I jumped on the internet and typed in scrapbook school page to get some ideas. One idea I liked was to use a piece of notebook paper behind the feature photo. I found some ledger style paper in a pack of designer paper from Stampin' Up, and used a punch from EK Success to make it look like torn out spiral notebook paper. Then I roughed up the edge of the notebook page so it would look ragged, like it does after you tear paper out of a notebook. I wrote the word "Kindergarten" and "2009-2010" with the teacher's name and the name of the school at the top of the ledger page (journaling pen by Creative Memories). I found the class list and wrote all of the kids' names on the ledger paper. I set the ledger paper at an angle and then placed my son's photo on top. I used some ribbon that looks like a tape measure across the bottom of my son's photo, and attached a "k" stencil over the ribbon. I also added a soft yellow "k" charm from Around the Block to the stencil. Beneath the ribbon, I used some white sticker letters that look like a child's handwriting to spell out "Kindergarten 09". I added a large letter K from Deja Views with star clips from Oriental Trading Company to the upper right hand corner of the page. I liked how the page looked, but thought it needed something else. So, I got a sponge brush and a bottle of white paint (Plaid) and smeared it on the page randomly, even on my son's photo. Too much white...so I got out a bottle of lettuce paint (Ranger) and added that. Then a little more white. I never had so much fun making a scrapbook page and playing with paint!


Tuesday, March 13, 2012
Day 73: Bob the Builder
My son took tumbling and had a routine to the theme music of the "Bob the Builder" television show. His costume was pretty simple, just a t-shirt, shorts, a hard hat, and a blow-up hammer. The photo was taken outside of the gymnasium at school. I thought the gray brick paper (unkown) and the red brick paper (Miss Elizabeth) would complement the brick wall seen in the background of the photo. I used yellow letters from Creative Memories to spell out the title and the date. The "Bob the Builder" figure on the left side of the photo is actually from the shirt he was wearing in the photo. I cut it out and ironed fusible web on the back of it to give it body, and I used double-sided tape to attach it to the scrapbook page.


Wednesday, March 7, 2012
Day 67: Soccer Layout
I completed a two-page soccer layout for my son's scrapbook very quickly. It just seemed to come together! I used soccer ball paper from The Paper Studio for my backgrounds.
My left-hand page just looks like one big soccer ball. Then I have a horizontal 5" x 7" photo centered 0.75" from the top of the page. I have two 3.5" x 4.5" photos that I placed on the bottom corners of the larger photo, angling them inward. I used a soccer ball and a "swoosh" sticker in the space created by the three photos. I cut a 2" x 12" border from a photo paper of grass and adhered it 0.50" from the bottom of the page. I thought the grass title strip tied the page all together, since all you see when you take photos of soccer games is lots and lots of grass! I used a 1.5" x 4.5" "Soccer" border by Laserline in the center of my "grass" strip. On the left side of the "Soccer" title, I used stickers to spell out the month and on the right side of the title, I used numbers to create the date (these stickers from Creative Memories).
My right hand page is a black background with multiple photo images of soccer balls repeated over and over. I had 5 photos that I wanted to use, but a couple of them were shots from far away, and I wanted to be sure years from now we would be able to see our son, so I cropped out a lot of the background and made really narrow pictures. I angled them off from my longer photos. I used some epoxy soccer embellishments from Creative Imaginations to add some visual interest, and this layout was complete!


My left-hand page just looks like one big soccer ball. Then I have a horizontal 5" x 7" photo centered 0.75" from the top of the page. I have two 3.5" x 4.5" photos that I placed on the bottom corners of the larger photo, angling them inward. I used a soccer ball and a "swoosh" sticker in the space created by the three photos. I cut a 2" x 12" border from a photo paper of grass and adhered it 0.50" from the bottom of the page. I thought the grass title strip tied the page all together, since all you see when you take photos of soccer games is lots and lots of grass! I used a 1.5" x 4.5" "Soccer" border by Laserline in the center of my "grass" strip. On the left side of the "Soccer" title, I used stickers to spell out the month and on the right side of the title, I used numbers to create the date (these stickers from Creative Memories).
My right hand page is a black background with multiple photo images of soccer balls repeated over and over. I had 5 photos that I wanted to use, but a couple of them were shots from far away, and I wanted to be sure years from now we would be able to see our son, so I cropped out a lot of the background and made really narrow pictures. I angled them off from my longer photos. I used some epoxy soccer embellishments from Creative Imaginations to add some visual interest, and this layout was complete!


Friday, March 2, 2012
Day 62: Fairies
I found this great paper by Graphic 45 that has these beautiful fairies all over it. Titled "Once Upon a Springtime", it made the perfect background page for this photo of my daughter. In order to save the fairies that would otherwise be hidden, I cut out the center part of the paper behind the 8 x 10 photo and rose mat (American Crafts). I fussy-cut the fairies out and will use them to make greeting cards. From the text portion of the paper I saved, I punched out four photo corners using a corner punch by EK Success. In each of the photo's four corners, I placed the photo corner, added two leaves from Jolee's, and a rose from Stampin' Up! I chose to use two blue roses and two dark pink roses because I wanted to pull in the colors from the fairies on the paper. I wanted the photo to be the focal point of the page, therefore I did not title the page. I simply wrote my daughter's name and the date beneath the photo using a journaling pen from Creative Memories.


Subscribe to:
Posts (Atom)