

Monday, December 31, 2012
Day 366: Anna Griffin: With Sympathy
Sending a sympathy card as pretty as this might help ease the pain a little:

Sunday, December 30, 2012

Saturday, December 29, 2012

Friday, December 28, 2012

Thursday, December 27, 2012

Wednesday, December 26, 2012
Day 361: Anna Griffin: Thank You
Here is a "thank you" card I made using supplies from one of Anna Griffin's fabulous card kits!


Tuesday, December 25, 2012
Day 360: Anna Griffin: Happy Birthday
How appropriate to make a "Happy Birthday" card on Jesus' birthday!


Monday, December 24, 2012
Day 359: Anna Griffin: Hello Card
Here is a "Hello" card I made from Anna Griffin's Cutting Garden Card Kit:


Sunday, December 23, 2012
Day 358: Anna Griffin: I Love You
Today I created this "I Love You" card and will most likely give it to my husband for our anniversary.


Saturday, December 22, 2012
Day 357: Anna Griffin: On Your Birthday
Since we are travelling for the holidays, I brought along a card-making kit by Anna Griffin. Anna's card kits are always fun. She makes all the pieces and I get to have all the fun designing the cards. The card I made today is "On Your Birthday."


Friday, December 21, 2012
Day 356: Isaiah 40:8 Bookmarks
I stamped Isaiah 40:8 "the grass may wither but the word of the Lord stands forever" for first layer of bookmarks I am making for the ipcoming men's and women's Walks to Emmaus.
Thursday, December 20, 2012
Day 355; Altered Record Album: What Child Is This?
I added ribbon to a record album I altered with sheet music, a stamp of Santa praying by Baby Jesus (Repeat Impressions), and the title "What Child Is This?" Photo to come.
Wednesday, December 19, 2012
Day 354: Matthew 22:37 Bookmarks Finished
Tonight I made the second and third layers for the bookmarks, and I added the eyelets and the ribbons to finish off the bookmarks.
Tuesday, December 18, 2012
Day 353: Matthew 22:37 Stamped Bookmarks
Tonight I stamped 10 images of Matthew 22:37 onto white card stock. I will make the second and third layers of the bookmarks and add the ribbons tomorrow.
Monday, December 17, 2012
Day 352: Fruit of the Spirit Bookmark Galatians 5:22
Tonight I made 10 bookmarks for the upcoming Men's and Women's Walks to Emmaus.
Sunday, December 16, 2012
Day 351: Adding verses to Christmas Cards
Tonight I worked on adding verses to the inside of Christmas cards I have made.
Saturday, December 15, 2012
Friday, December 14, 2012
Day 349: College Photo: Lady in Red
Today I added the title "Lady in Red" to the page. I also kept working on embellishing my page with items from my stash.
Thursday, December 13, 2012
Day 348: College Photo
Today I worked on my college photo. I selected papers from one of Stampin' Up!'s series of designer papers. I chose three papers that were all red tones to layer. I began adding some images from Graphic 45's "Ladies' Diary" along with some buttons and other goodies from my stash. It still needs more, so I will work on it again tomorrow.
Wednesday, December 12, 2012
Day 347: Stamping Verses on Cards
Tonight I stamped verses inside of the cards I have made to get them ready to be made out.
Tuesday, December 11, 2012
Day 346: Philippians 4:8 Bookmark
Tonight I made this bookmark for my Stephen Minister. We had been meditating on this verse from Philippians, and I thought I would make her a book mark with the verse stamped and heat-embossed. All papers and ribbons were from my stash. Stamp by Morning Star Stamps.


Monday, December 10, 2012
Day 345: Stamping Ornaments
Tonight I used the ornament stamp from Repeat Impressions and some Stampin' Up! images to make "ornaments" to embellish cards.
Sunday, December 9, 2012
Day 344: Home Christmas Card
Tonight I made this Christmas card for my husband. The image is by PSX. I stamped the image with Memento ink and used Copic markers to color it in. I added some fake snow for added depth, and then used an oval frame that was in my stash to draw the eye in.


Saturday, December 8, 2012
Day 343: Christmas Postcard
Tonight I made some more cards with the Christmas Postcard image from Stampin' Up!
Friday, December 7, 2012
Day 342: Christmas Postcard
Tonight I was inspired by a card I viewed on Splitcoaststampers and made this card using Stampin' Up!'s Christmas Postcard stamp. I changed it up a little bit. I used red card stock from Recollections by Michael's. I also did not have the floral embossing folder so used a scallop one I had. I colored the card in with Stamp 'n' Write markers.


Thursday, December 6, 2012
Day 341: Surfing the Net
Tonight I was looking at a variety of cards on the Internet so I could gain some inspiration for ideas for Christmas cards. Do you ever buy a stamp because you like it, but then you don't know how to use it and make a great looking card? That is when I find it is time to be inspired by other people's creativity.
Wednesday, December 5, 2012
Day 340: Ornament Stamp and Punch Card Day 2
Today I spent some time tweaking this card. I did not like the design I originally had at the top of the card, so I used some ribbons to make a border. I like it so much better.


Tuesday, December 4, 2012
Day 339: Ornament Stamp and Punch Card Day 1
I keep all the handmade Christmas cards I get each year and file them away so I can have inspiration when I make Christmas cards. Tonight I pulled out one my sister had sent me and decided I could use up some scraps of Christmas paper to make a card with the ornament stamps and punch from Stampin' Up!
Monday, December 3, 2012
Day 338: Dreamweaver Cameo Silhouette Embossed on The Big Shot
Today I used a core'dinations "white wash" collection paper with a black core and a Dreamweaver brass cameo stencil to create the cameo silhouette below. I cut it out using the ovals die by Sizzix and my Big Shot. I embossed the image before I cut it out, so I accidentally cut off some of the design on the right side. I will probably just save it and use it in a collage where I can hide the mistake under another image. I used a thick emery board to sand off the white wash to show the black core of the paper. I wanted to use black because traditionally a silhouette is a black image on a white background, but I think this would be pretty in a variety of the core'dinations colored papers.
If you would like to emboss using your Dreamweaver stencils and your Big Shot, check out the site I used to find out how to make the "sandwich" for my Big Shot.

If you would like to emboss using your Dreamweaver stencils and your Big Shot, check out the site I used to find out how to make the "sandwich" for my Big Shot.

Sunday, December 2, 2012
Day 337: Cleaning Badly Stained Stamps with StazOn Stamp Cleaner and Remounting with Jim Stephan's Stamp Cushion
I attended a first Sunday flea market today and found a lady who was clearing out some of her unwanted stamps. Several of them were like new, but one was a "K" initial, and even though it was badly stained, I decided to buy it. When I got home, I realized that not only was it badly stained, but there was no cushion underneath it. I decided I would take the image off the wood block to clean it and then add new cushion. I saturated the rubber with StazOn stamp cleaner, let it sit for a few minutes, and then used an alcohol wipe to clean the ink off. I did that three or four times before the image was clean.
(You can buy alcohol wipes in a convenient container at most local pharmacies; I love them for cleaning ink off my hands or the acrylic stamping square that goes with my Stamp-A-Ma-Jig. You really should not use alcohol to clean your stamps, but this one was so badly stained, a little alcohol wasn't going to ruin it. I was mainly using the wipe to help remove the StazOn cleaner and the old ink.)
After that I used some cushion from Jim Stephan's Rubber Art Ink Stamps Store (ebay) to remount the stamp. If you are looking for cushion to mount stamps, I highly recommend Jim's. He makes his own, it is black, with adhesive on both sides, it is a nice thickness, and I have used it for years.
To keep your stamps from becoming badly stained, clean them after each use. If you are trying to clean a badly stained stamp, I highly recommend saturating your stamp with StazOn Stamp Cleaner (available on the internet, at box craft stores like Hobby Lobby and Michael's, and most independent stamp stores), waiting a few minutes, and then cleaning it off. This has worked for me 99% of the time if I purchase a stamp that is badly stained. And remember, just because a stamp is badly stained, often the stamped image looks fine, so if there is a stamp you love, and the price is right, take a chance and buy it. Or use the stained condition as a way to bargain with the seller and get the price reduced; at least if it doesn't clean up, you won't feel like you totally wasted your money.
Saturday, December 1, 2012

Friday, November 30, 2012

Thursday, November 29, 2012
Day 334: Jazzin' Up!
Tonight I just jazzed up a couple of cards I had previously made with some ribbon. They needed a little "something-something", and ribbon was the something!
Wednesday, November 28, 2012
Day 333: Spun Sugar Artful Card Kit: 3 Card Designs
Tonight I created three cards using some of the contents of Hot Off The Press's Spun Sugar" Artful Card Kit.


Tuesday, November 27, 2012
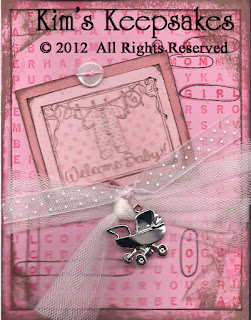
Day 332: Welcome Baby Card
I found out that a friend had a beautiful baby girl tonight, so I had to make a card to include with my gift. I used card stock, inks, and stamps from Stampin' Up! (The rose colored card and dotted pink were in my stash, but they are not SU). I circled the words in the word background that applied to this baby with a journaling pen from Creative Memories. I tied white tulle and a sheer pink ribbon with white polka dots (both from my stash) around the word search, and added a Hallmark baby buggy charm to the ribbon with a pink safety pin from Oriental Trading Company. I used some Scrapper's Floss (Karen Foster) to "tie" on the pink button (my stash).

Monday, November 26, 2012
Day 331: Nine Piece Christmas Quilt Card
Tonight I was looking to make a really quick Christmas card, so I cut some scraps of nine different Christmas papers into 1.25 inch squares, punched out a square of 1.50 inches as a pink background, and adhered them all to a pretty green card stock. Christmas papers by K & Co. Plain card stock by Stampin' Up! Polka Dot ribbon by Oriental Trading Company.


Sunday, November 25, 2012
Day 330: Organizing Ribbon Scraps
I spent this evening organizing a lot of my ribbon scraps. I wrapped them around embroidery thread holders by Yarnology, available at Hobby Lobby. It took a while, but I got more than 75 ribbons on the holders and organized them by color and put them in a nice storage container, also by Yarnology.
Saturday, November 24, 2012
Day 329: Holy Triptych Card Day 3
Today I mounted all of the cut outs onto "Pacific Point" card stock by Stampin' Up. I really like how this card turned out. I made 6 cards total, to use as thank you notes to all the people/families who helped with the Happy Birthday Jesus party at my church.


Friday, November 23, 2012
Day 328: Holy Triptych Christmas Card Day 2
Today I used Smooch Accent Ink in gold and silver to highlight the gifts of the wise men, the star and halos, and the angel's wings. I also cut out all the sections of the triptych.
Thursday, November 22, 2012
Day 327: Holy Triptych Christmas Card Day 1
Tonight I stamped and colored images using Stampin' Up's Holy Triptych nativity set. I stamped the images on Neenah paper, using Memento inks and my Stamp-A-Ma-Jig to line them up, and then I colored the images with Copic markers.
Wednesday, November 21, 2012
Day 326: Graphic 45 Scrapbook Page
Today I finished my scrapbook page using papers and stickers from Graphic 45. I used some dress embellishments from Buttons Galore, pearls from Jolee's, pearl hat pins from Maya Road, part of a flower (I used the lace) from Prima, and a scrap of ribbon from my stash to complete the page.


Tuesday, November 20, 2012
Day 325: Graphic 45 Scrapbook Page
Today I selected three sheets of Gallery 45 papers to use on a page for a photo of me when I was first dating my husband.
Monday, November 19, 2012
Day 324: Stampin' Up! Flower Petal Cards
I received a lovely gift of earrings in the mail today from a girlfriend, and was inspired to use these lovely flower petal cards from Stampin' Up. I used some K and Co paper on the inside of the card so that the design showed through the flower openings. I sponged a little rose distress ink (Ranger) on the top of the card, added a yellow button (SU or my stash, depending on the card) and a green Jolee's pearl in the button center.


Sunday, November 18, 2012
Day 323: Ribbons for Paper Clip Bookmarks
Today I added some pretty ribbons to some jumbo paper clip book marks I had made.
Saturday, November 17, 2012
Day 322: Crafting Blues
I have been so busy lately. It just seems like now that the holidays are upon us, I have less time to craft, and even less desire. I just have not been really inspired to make Christmas cards yet this year. Today I messed around in Photo Shop and spent some time doing stuff on the blog, but am just not in the mood to create today. So much for 365...
Friday, November 16, 2012


Thursday, November 15, 2012
Day 320: Little Yellow Bicycle Acorn Hollow Cards
I created these two cards for The Paper Forest Scrapbook Boutique with products from Little Yellow Bicycle's Acorn Hollow line of products, a leaf punch from EK Success, and my Big Shot and dies from Sizzix.


Wednesday, November 14, 2012
Day 319: Little Yellow Bicycle Acorn Hollow Scrapbook Page
Today I created this scrapbook page for The Paper Forest Scrapbook Boutique, a new scrapbook store that opened in Washington, Illinois. Products used are from the Acorn Hollow line by Little Yellow Bicycle, Stampin' Up! (lace), and Tim Holtz (metal photo corners).


Tuesday, November 13, 2012
Day 318: Faith Book: Holy Communion and Awanas
Today I worked on a Holy Communion page and an Awanas page for the Faith Book.
Monday, November 12, 2012
Day 317: Faith Book: Third Grade Bible Presentation
Today I worked on the Third Grade Bible Presentation page for the Faith Book I am working on for church.
Sunday, November 11, 2012
Day 316: Faith Book: Little Lambs Preschool
Today I created a Little Lambs Preschool page for the church Faith Book.
Saturday, November 10, 2012
Day 315: Faith Book: Selecting Photos
Today I spent quite a while selecting photos to be used on the church's sample Faith Book. I chose pictures for Little Lambs, Awanas, Vacation Bible School, 3rd Grade Bibles, and Holy Communion. I uploaded the selected photos to a local store to be printed and will pick them up tomorrow to start working on the pages.
Friday, November 9, 2012
Day 314: Faith Book: "SPF 12 Following the Son" VBS Page
The kids at our church always make a photo frame that reflects the frame of VBS for the week. They get their photo taken and put it in the frame. I decided to use a lot of Creative Memories products on this page because they worked with the colors in the photo.


Thursday, November 8, 2012
Day 313: Faith Book: Presentation Page and Baptism Page
I started working on a (sample) Baptism page for my church's Faith Book today. I used a solid blue paper from my stash as the background page. I used two embossed frames from Making Memories, made some title banners from scrap paper, and used two title blocks from Making Memories as accents for the photos. Sticker letters by Marjolein Bastien. Crosses and starbursts from Jolee's Boutique complete the page.


Wednesday, November 7, 2012
Day 312: Spun Sugar Artful Card Kit Part 1
Tonight I punched out all of the die cut shapes that are part of the Spun Sugar Artful Card Kit from Hot Off The Press. I will have to work on designing the cards another day, but at least the die cuts are punched out and ready to be used.


Tuesday, November 6, 2012
Day 311: Sympathy Card
Unfortunately, the mom of one of my daughter's friends died yesterday, so tonight I helped her to make a sympathy card. I showed her how to use the Cuttlebug embossing folder, how to use the Stamp-A-Ma-Jig to position her stamps where she wanted them, and how to use Copic markers to color the praying hands image (Dollar Tree; all other images and verses shown, card stock: Stampin' Up!). Inks: Brown: Memento and Silver: Colorbox. My daughter selected the card stock, embossing folder, and all the stamps and inks used. Hopefully this card will help lift her friend up after the sudden and unexpected death of her mother.


Monday, November 5, 2012
Day 310: Organizing Big Shot Supplies
Tonight I organized my Big Shot dies, cutting plates, extra die cuts, embossing folders, etc. At first I kept everything together in one big container, but as I have accumulated more supplies, it was not working. Tonight I put my 12" dies and cutting plates in a big basket. I put all of my regular size dies in a storage container with the names of each die facing up so it is easier for me to find what I am looking for. I put all of my extra die cut shapes in another storage container, but separated them by type of die cut (i.e., circles, or label, etc.). Often I have the negative image of a die remaining, or maybe I cut something out in one color and decide it doesn't look right for whatever I am working on; then I have a die that I need to save to use on something different.
Working on getting these tools better organized will definitely help me to work more effectively the next time I want to make something with them, so I feel like it was time well spent to organize this area of my scrapbook and card-making room.
Working on getting these tools better organized will definitely help me to work more effectively the next time I want to make something with them, so I feel like it was time well spent to organize this area of my scrapbook and card-making room.
Sunday, November 4, 2012
Day 309: Old and New Stampin' Up! Stamps Sets
Today I mounted 6 sets of stamps from Stampin' Up! I had some that I had purchased from yard sales and a couple that I had ordered from the current catalog. I really enjoy the fact that SU now die cuts all of their stamps. While I like the two older sets I put together, I had forgotten about the time it takes to cut around all those images. Upon occasion, I have just mounted the stamps without cutting close to the images, but I find that it is worth the time to cut around them so as to end up with cleaner stamped images.
Saturday, November 3, 2012
Day 308: Day of Gratitude Thanksgiving Card Version 4
Finally, all done making my Thanksgiving cards!


Friday, November 2, 2012
Day 307: Day of Gratitude Thanksgiving Card Version 3
The really nice thing about using a series of coordinating papers and stamps is that you can stamp one image and mix and match it with lots of different papers for totally different looks.


Thursday, November 1, 2012
Day 306: Day of Gratitude Thanksgiving Card
I have been making Thanksgiving cards using the Day of Gratitude stamp set and coordinating designer paper from Stampin' Up! and using a technique I learned on Meg Loven's blog. Today I got all of the stamped images cut out; cut and scored card stock (Recollections by Michael) for the card bases; and stamped the inner verse on all the cards I plan to send for Thanksgiving. (That felt pad is still able to be used on day three of this project!!) I will spend time tomorrow assembling more of the cards.
Wednesday, October 31, 2012
Day 305: Day of Gratitude Thanksgiving Card Version 2
I have been making Thanksgiving cards using the Day of Gratitude stamp set and coordinating designer paper from Stampin' Up! and using a technique I learned on Meg Loven's blog. I was able to get three more cards made today in between all the other busy-ness of Halloween! A few subtle variations in the colors on the flower image today. And how cool that I left the felt sitting on my desk overnight and was still able to use it today!


Tuesday, October 30, 2012
Day 304: Day of Gratitude Thanksgiving Card Version 1
I was googling ideas for using the flower image from the Day of Gratitude stamp set and the matching designer paper by Stampin' Up!, and came upon Meg Loven's September 8, 2010 blog post. She described how to make custom felt pads using a piece of regular felt, an absorbent tile, and re-inkers. I thought it was such a neat technique, I decided to try it, and this is the result:


Monday, October 29, 2012
Day 303: One Moment in Time Gears Card Part 2
I punched gears and circles out of brushed silver card stock by Stampin' Up! I used my Stamp-A-Ma-Jig and rich cocoa Memento ink to stamp the pocket watch (Rubber Stampede) and the verse (Repeat Impressions) onto the silver card . I ran everything through the Xyron machine, then attached the pieces to the front of my card. The inside verse I wrote says: Your birthday only comes once a year, so Celebrate!


Sunday, October 28, 2012
Day 302: One Moment in Time Gears Card Part 1
I need some men's cards for upcoming birthdays. I started out with intentions of making an entirely different card, but when I was looking for an embossing folder to use as a background, I came upon this Tim Holtz gears embossing folder, and changed my mind completely! I used kraft cardstock by Recollections (Michael's), ran it through my Sizzix Big Shot machine, then used a Ranger silver paint dauber and Ranger chocolate distress ink to highlight the embossed areas. I got enough backgrounds done to make 8 embossed card bases, but will need to finish working on these tomorrow.
Saturday, October 27, 2012
Day 301: Free Star Embellishments!
Today I punched out 50 small stars from the foil waste from my Botanicals 3-D kit (see Day). Nothing like free embellishments!
Friday, October 26, 2012
Day 296: Circles for Bingo from Scrap Papers
Tonight I punched out approximately 1000 circles from scrap papers with my one inch circle punch from EK Success. The circles are to be used as markers when we play bingo at our church's Happy Birthday Jesus Party. Since very small children will be playing, I thought paper circles would be safer than bingo chips.
Thursday, October 25, 2012
Day 295: Daisy D's Kits
I have a little space I keep at a local craft and antiques shop and I need to make up some kits of Daisy D's papers to sell. I spent the evening cutting samples from each of the paper and figuring out the papers that will go in each kit.
Wednesday, October 24, 2012
Day 294: Jesus is the Reason Card
I needed to make a quick card to enclose with an early Christmas present for my parents. I chose to use this stamp from Paper Inspirations as the main sentiment. I stamped it on craft card stock (Recollections by Michael's) in red StazOn ink, added some paper with the names of Jesus on it (Hobby Lobby), and added a burgundy ribbon from my stash. A quick but meaningful card.


Tuesday, October 23, 2012
Day 293: Merry Christmas Train Card
Tonight I was looking to make a really quick card and use up some bits and pieces I had. I cut a card base from Stampin' Up! card stock, and on top of it I layered a piece of upcycled clear packaging that I had embossed with the Cuttlebug snowflake embossing folder, then I added a bit of Merry Christmas ribbon (Oriental Trading Company), and a train and snowflake from Jolee's. Does this make a cute card or what?!


Monday, October 22, 2012
Day 292: Sorting and Organizing
My daughter wanted to make some extra money, so I told her she could help me organize my scrapbook paper. I am a paper addict and buy it constantly! We worked for about an hour and got my room a lot more organized. We sorted by color, design, or occasion. I had tried sorting by themes like "girl", "boy", "vintage", etc., but then I often overlooked some papers because I didn't look in a certain category. Hopefully this re-organization will lead to me using up more of my papers when I create cards and scrapbook pages. Thanks for all the help, my girl!
Sunday, October 21, 2012
Day 291: Clear Die Cut Snowflakes
I really liked how the clear die cut snowflakes looked on my cards last night, so tonight I got into my stash of clear plastic I have saved from the kids' toy packaging and cut out a bunch more. I used my Big Shot and snowflake die by Sizzix.
Saturday, October 20, 2012
Day 290: Reindeer Frame Card
Tonight I was inspired by a Christmas card my Stampin' Up! representative had demo'd for my stamp club. I die cut a frame from red Stampin' Up! card stock, embossed it in Cuttlebug's snowflake embossing folder, adhered it to a craft card base (Recollections by Michael's), and then used my Stamp-A-Ma-Jig to stamp the reindeer inside of the frame. My representative used a felt snowflake from Stampin' Up! at one corner of the frame, but I added my own twist and also used a snowflake brad (Creative Impressions) and a clear die cut snowflake to add more depth and dimension to the card. Clear snowflake from Sizzix die, clear material re-purposed from packaging. I added a little bling by using pearlized white Smooch at the end of the reindeer's antlers and on the center of the white snowflake brad.


Friday, October 19, 2012
Day 289: Color Me Floral Card Topper Part 2
Today I mounted my colored floral card topper onto Stampin' Up! card stock, stamped the inner sentiment, and added the "love you lots" tag, which I colored with Copic markers.

Thursday, October 18, 2012
Day 288: Color Me Floral Card Topper Part 1
I colored a card topper from Hot Off the Press with Copic markers tonight. I will finish this card tomorrow.
Wednesday, October 17, 2012
Day 287: Bird Tile

Tuesday, October 16, 2012
Day 286: Last Minute Projects
Today I just finished up some last minute projects that needed tweaking.
Monday, October 15, 2012
Day 285: Japanese Girl Journal Completed
I made this journal using this pretty paper from My Little Shoe Box. The fan was in my stash. I used Mod Podge to adhere all the papers and the fan to the composition notebook.


Sunday, October 14, 2012
Day 284: Japan Girl Journal Cover
Tonight I covered a composition journal in some pretty paper with a Japanese print. I will work on finishing it tomorrow.
Saturday, October 13, 2012
Day 283: Copyright Signature Brush
Tonight I created a signature brush in Adobe Photoshop so that I can copyright my work. Please know that I reserve all rights to any work shown or written about within this blog. If you copy a photo that does not have my "Kim's Keepsakes" signature on it, please be kind enough to credit my work. If you "scraplift" or are inspired by my works, even if you tweak it for your own uses, please note me as the source of your inspiration. Thanks!
Friday, October 12, 2012
Day 282: Glamour Shots: Sugar and Spice Part 2
My daughter helped me decide how to embellish this page tonight. I was showing her some crocheted flowers (Prima) I have been wanting to use, but I thought even though they were "soft" looking, they were almost too "heavy" for the page. She noticed a gold heart that I had saved from a handbag (Relics), and suggested that I place it under one of the flowers to help the flower to look softer. Those opposing soft and hard textures helped the flower to feel lighter, because that heavy gold heart grounds it. Last but not least, I added the beautiful stud and pearl swirl by Prima to the left side of the photo.


Thursday, October 11, 2012
Day 281: Glamour Shots: Sugar and Spice Part 1
Tonight I decided what the title for this page should be: Sugar and Spice. Again, I was trying to highlight the dichotomy between the studded leather jacket I am wearing with the feminine Graphic 45 papers I used for the background of this page. I used some lace (offray) at the top of the page for a soft effect, then used black rick rack (American Crafts) on top of that, again, those opposites. I dug through my stash of "scrabble" letters to make the words "sugar, spice" and stamped a large ampersand (Stampabilities) on cream card stock and matted it with black to make my title. I put some of the torn pearl paper I used on my "Pearls and Leather" page (see yesterday's post) underneath my photo and punched out two photo corners to frame the photo. However, this page needs something more. I will work on it more tomorrow. Corner punch by EK Success.
Wednesday, October 10, 2012
Day 280: Glamour Shots: Pearls and Leather Part 3
I added some tan Prima flowers with matte gold brads and a heart embellishment (Buttons Galore) to the page and now I am happy. Pearls and Leather page is finished!


Tuesday, October 9, 2012
Day 280: Butterfly Stitches
I made this card for a baby shower. Everything I bough for my gift had a butterfly in it or on it, so I wanted my card to have butterflies as well. I used pink and yellow card stock from Stampin' Up! as the card. I used the We R Memory Keepers "Sew Easy" piercer tool kit to make the dots for the stitching, and some of the yellow floss to create a trail from one butterfly to the next. I stitched the butterflies onto the card for security, alternating from dark to light yellow, ending in a multi-color butterfly to symbolize the new baby girl on the way. Crystals from Jolee's add a little bling to the centers of the butterflies.
I adapted a poem by Robin Fogle to use as the sentiment in the card:
Like a butterfly emerges
And unfolds its graceful wings
A child grows and develops
With the love only parents can bring.
Your baby is twice blessed by God:
Once because He has given her wings
And again because He chose you
To teach her to fly...

Monday, October 8, 2012
Day 279: Glamour Shots: Pearls and Leather Part 2
Now that we have returned from our weekend trip, I can get back to work on this scrapbook page.
I really like the look of all the "banners" that have become so popular. I had some tags in my stash that I thought worked with this page, and decided to make a banner with them. Using my Crop-A-Dile, I added copper and pewter eyelets to the tags, and then laid them across a strand of the torn pearl paper (Graphic 45) to make a banner. I found some typewriter key letter stickers in my stash and spelled out my name on the center three tags. While going through my stash, I found some coordinating stickers (and for the "love" sticker, a coordinating overlay, which I stapled on), I made a border for the bottom of the page. I am not happy with this page yet. It needs something more. I will leave it tonight and work on it again tomorrow.
I really like the look of all the "banners" that have become so popular. I had some tags in my stash that I thought worked with this page, and decided to make a banner with them. Using my Crop-A-Dile, I added copper and pewter eyelets to the tags, and then laid them across a strand of the torn pearl paper (Graphic 45) to make a banner. I found some typewriter key letter stickers in my stash and spelled out my name on the center three tags. While going through my stash, I found some coordinating stickers (and for the "love" sticker, a coordinating overlay, which I stapled on), I made a border for the bottom of the page. I am not happy with this page yet. It needs something more. I will leave it tonight and work on it again tomorrow.
Sunday, October 7, 2012
Day 278: Heritage Gardens 3-D Papier Tole Die Cuts
More 3-D die cuts I made while on our trip to see family. This set is "Heritage Gardens" by Hot off the Press, available from Paper Wishes Catalog.

Saturday, October 6, 2012
Day 277: Botanicals 3-D Papier Tole Foil Die Cuts
It was an easy project to make these 3-D die cuts while traveling this weekend. "Botanicals" foil die cuts by Hot Off the Press.

Subscribe to:
Posts (Atom)