

Thursday, May 31, 2012
Day 152: My Dear Kind and Wonderful Friend Card
A friend did me an enormous favor and played chauffeur for me while my car was being repaired. I wanted to make her this card to say thank you. I have been crazy about the "My Dear Kind and Wonderful Friend" stamp from Stampin' Up! for a long time, and finally purchased it on ebay. I used Sizzix die cuts for the frame, the sponging, and the swirls. The flowers were some that I punched from scraps while I was on vacation over Memorial Day. Ink and card stock by Stampin' Up! Brads from Oriental Trading Company.

Wednesday, May 30, 2012
Day 151: Making Cards With My Kids
Today I helped my daughter to make a Father's Day card for her dad, and I helped my son and my daughter to make end-of-the-year teacher thank you cards.
 |
| Father's Day Card by my Daughter |
 |
| Teacher Thank You Card by my Daughter |
 |
| Teacher Thank You Card by my Son |
Tuesday, May 29, 2012
Day 150: Sorting It Out
Today I sorted out all the butterfly and flower punches I made while on vacation. Lots and lots!
Monday, May 28, 2012
Day 149: Lisa Bearnson Kit: Love Card
I made this card in the car today, from a kit by Lisa Bearnson:


Sunday, May 27, 2012
Day 148: Scrap While on Vacation
Tonight, my daughter and I punched more butterflies and flowers from yellow and peach scraps. When traveling, it is nice to be able to use that down time in the hotel to do something that will make your life easier when you are creating. It is great to just be able to have ready-made items in your stash. It makes your scrapbook pages or cards come together so much faster when you are working on them!
Saturday, May 26, 2012
Day 147: Punched Shapes from Patterned Papers
Tonight my daughter helped me to punch shapes from different patterned papers. It is always so fun to see how pretty the butterflies and flowers looked once they were punched out of the different patterns.
Friday, May 25, 2012
Day 146: Punches from Scraps
We are traveling this Memorial Day weekend, so I brought two butterfly punches and a flower punch to make some punches from my scraps. Tonight I punched out lots of green 5 petal flowers (great as leaves behind other flowers) and butterflies.
Thursday, May 24, 2012
Day 145: Father's Footprints Father's Day Card
In order to create this card, I used the following images from Repeat Impressions: 4028-H, "The journey of life . . ."; 2720-G, "Left Boot Print"; and 2721-G, "Right Boot Print". These were my main images on this Father's Day card I created for my Dad. When I was a little girl, my sister and I always untied my Dad's work boots when he got home. When I saw those boot prints, I knew I had to make a Father's Day card for him. I used some "dirt" paper as my background for the boot prints and for the "journey" quote. I used my Crop-O-Dile to add gold eyelets in each corner of the dirt. I used a map from an atlas with my home town on it as a background. My Dad was a truck driver and the map ties in well with the "journey" quote. I felt like the card needed something else, so I used a compass stamp from Stampin' Up! (SU). I punched it out and mounted it on a couple of different sized circles, used my double slit punch (SU) to thread some ribbon through and then adhered an antique brad (SU). I mounted it all on Chocolate Chip card stock (SU).

Wednesday, May 23, 2012
Day 144: Stenciled Tulip Card
I made a stencil using some plastic I saved from packaging and the Bigz Tulip die (made by Sizzix for Stampin' Up!) and then I used it to design this card. The paper, stamps, inks, and punches are also by Stampin' Up!; ribbon, unknown.


Tuesday, May 22, 2012
Day 143: A Pastel Christmas
Products from Stampin' Up! (SU), October Afternoon (OA), and K & Co. (K) give this page a soft, warm, Christmas-y feeling. For the background paper, I selected the "Swell Noel Tiny Ornaments Flat Paper" (K) because the design pulled out the pattern on Santa Claus's vest, really drawing the eye to the photo of Santa and the children. I used "Pool Party" (SU) card stock as my background for the photo and the side border. The velvet trim (K) adds texture and grounds the photo and side border to the page. The letter from Santa and the Christmas traditions journaling blocks (OA) add interest and memories. Felt snowflakes (SU), a Santa cut-out (K), and a decorative Christmas gift tag (?) help to round out the page.


Monday, May 21, 2012
Day 142: How to Scrap A School Photo Using Pink!
I dug through my stash of goodies to find embellishments for this school photo of my daughter. It is hard to find "school" embellishments that are pastel colors. In order to be used for boys and girls, manufacturers of scrapbook products tend to produce items in primary colors.The background paper is one I had originally bought to use for my daughter's dance album, and then she decided not to dance anymore. The mulberry paper was from a friend who moved away. I used a library pocket by Marcella by K to journal her school information. I used the initial "h" by Making Memories to embellish the library pocket. I wrapped a little scrapper's floss by Karen Foster around one of the legs to add some texture and color to the "h". Heart stickers and a pink flower from Heidi Grace further embellish the envelope. A quote from Making Memories is added to the top of the library card. The quote reads "When I look at you I see the magnificence of another generation in your eyes." A chipboard flower from my stash made a good base for some felt flowers from Stampin' Up! and a flower brad. Another smaller flower and brad enhance the library envelope. Floral tabs by Heidi Grace pull in the pink, yellow, and orange colors from my daughter's sweater. I used some mailbox numbers from Making Memories to show the year. I think it looks pretty good for a pink school picture page!


Sunday, May 20, 2012
Day 141: School Portrait and Christmas Side By Side
I scrapbook chronologically, and I generally only scrap portraits, because I take way too many photos to scrap them all!! So, there are times when I have to get creative when I need to scrap two pages that don't really go together. Tonight, I have to scrap my daughter's school portrait (page left) and a picture of her and my son visiting Santa Claus (page right). Since my daughter was wearing a pink sweater in her school photo and was wearing a peach top in the Santa photo, I decided to use a pale color palette for the two pages. I selected some pink papers for her school photo and aqua papers for the Christmas photo. I will start designing layout tomorrow.
Saturday, May 19, 2012

Friday, May 18, 2012

Thursday, May 17, 2012
Day 138: Bringing Baby on Tag
Using my Fanciful Labels Embossing Folder Plus from Cuttlebug, I cut out pink and blue tags to use as frames for my Bringing Baby (Stampin' Up!) images. I am showing the blue here:


Wednesday, May 16, 2012
Day 137: Bringing Baby Stamped and Colored
My neighbor complimented my card-making skills and asked if I would make a set of baby cards for her to purchase. I knew right away I wanted to use Stampin' Up's "Bringing Baby" stamp. I used Memento ink in Tuxedo Black to stamp the image and then colored it with my Copic markers. I fussy cut the image and ran it through my Xyron. I colored blue and pink images, but am only showing the blue here:


Tuesday, May 15, 2012
Day 136: Let Your Dreams Take Flight
My daughter had her photo taken at the American Girl Store and it just so happened the photo background we chose had these butterfly, flower, and heart "tattoos", which ended up placed on my daughter's arm! Playing up on that sort of hippy 70's look with the tattoos and my daughter's tie-dye look shirt, I chose to use teeny vellum butterflies on top of the photo. I cut the butterflies out using colored vellum scraps from Hot Off the Press with a Sizzix die on my Big Shot die-cutting machine. The butterflies also influenced my choice for the title of this photo, "Let Your Dreams Take Flight". I selected the "Mini Flowers" paper by Kelly Pancci for Sandylion Designs as the background paper. I chose the flower cut-outs, photo corners, journaling block, and the title block from a K & Co. tin of die-cuts. I think it all works together in a funky kind of way!

Monday, May 14, 2012
Day 135: Daisy Kids Completed
I chose this daisy background paper from Stemma Masterpiece Studios because it matched the colors of my niece's dress! A sheet of vellum (Hot Off the Press) placed over the background made it a little more opaque. I fussy cut the kids' photo from the portrait because I thought it would be cute if it looked like they were sitting in a field of flowers. Putting their photo in the corner allowed me room to spell out each of their names using chipboard flowers and sticker letters (Heidi Grace) on yellow card stock from Stampin' Up! and then make a border along the left side. I used a small Stampin' Up! flower stamp and ink to add the fuschia colored flowers to each of their name cards.

Sunday, May 13, 2012
Day 134: Daisy Kids
Tonight I started working on a scrapbook page of my son, daughter, and niece. I have selected my background papers and made name cards for each of the kids, but the page needs something else. I will have to leave it for tonight and see if inspiration comes to me.
Saturday, May 12, 2012
Day 133: Cousins Scrapbook Page
I wanted to use this funky flower paper from My Mind's Eye as a background for this page. I made a tag to match by sponging a white tag (Paper Reflections) with blue, green, and fuschia ink from a Kaleidoscope ink pad by Tsukineko. I matted the white tag on green card stock from Stampin' Up! and punched a photo corner from a Paper Shapers punch. I had the fiber in my stash. Paper flowers from Prima helped to tie the page together as the backgrounds for the letters spelling out "Cousins" on the tag. A tattoo from KI Memories, and some buttons from Stampin' Up! added a little punch to the top of the photo.

Friday, May 11, 2012
Day 132: Garden Cousins
For this "Garden Cousins" page, I chose to use this "Floral Linen"paper from The Paper Studio as the background paper. I liked how it coordinated with the turquoise color in the kids' clothes. I cut three flowers out of the center of the paper to use as accents on the corners of the photos, then hid the holes in the paper with the turquoise photo mat (card stock from Stampin' Up!). The flower centers and the oval journaling sticker from Doodlebug Designs added a little extra pop to the page. I used two different color Gelly Roll pens from Sakura to highlight the important words in the quote.

Thursday, May 10, 2012
Day 131: Selecting Papers for Cousins Photos
My kids had some photos taken with my niece a couple of summers ago, so tonight I picked out my background papers and some letters I think will work. I will work on this more tomorrow.
Wednesday, May 9, 2012
Day 130: Beautiful
Tonight I worked on a page for my daughter, which I titled "Beautiful". The papers I used were by Anna Griffin. I added a "beautiful" rub on from Daisy D's. I also put a few pearls in my daughter's hair. I added a small green butterfly on the rose to cover up a boo-boo I made while adding the rub-on. I put lace on either side of the photo. I used my Sizzix Big Shot die cut machine and the roses die from Lifestyle Crafts to cut a length of floral material to make fabric roses. I used some old pearl buttons for the centers. I used my Big Shot and a leaf die from Stampin' Up! to cut the leaves out of green fabric.


Tuesday, May 8, 2012
Day 129: Smile and We Remember Moments
Today I completed the last two pages of my three-page family photo series, titled "Smile" and "We Remember Moments". I really did not have a plan for either one of these pages beyond the selection of the background paper. I just went through my stash of stuff and found embellishments that worked.


Monday, May 7, 2012
Day 128: Family Quilt Quote Scrapbook Page
I found a quote on the internet that I wanted to use on my family quilt scrapbook page. I typed the quote in Microsoft Word and used the "Batik Regular" font because it made me think of stitching. I printed the quote out on "Barely Banana" card stock by Stampin' Up!, cut it apart, and ran it vertically along each side of my 8" x 10" photo, which I centered in the middle of my four-patch paper quilt. I made a matching title "Our Family" and placed it above the photo. In order to note that this was a family photo and the date it was taken without distracting from the quote, I used clear tape in my Dymo Caption Maker to type out the information, and then adhered that beneath the photo.
The quote reads:
A family is pieced together with love and faith
A family is quilted and bound by love and grace

The quote reads:
A family is pieced together with love and faith
A family is quilted and bound by love and grace

Sunday, May 6, 2012
Day 127: Family Quilt Scrapbook Page
I decided to cut a 7 inch square from the center of each of the four patterned papers from Stampin' Up that I selected for my series of family photos. I then trimmed those four squares down to 6 inches square and then put them all together to make a 4 patch quilt. I used a template from Hot Off the Press to mark cross stitch and zig zag stitches along the edges where the 4 different papers touched. I then used my paper piercing tools to make holes for my needle to go through, threaded a needle with scrapper's floss by K & Co, and "stitched" the papers together.
Saturday, May 5, 2012
Day 126: Family Photo Series
Tonight I selected some background papers to use for a series of family portraits we had done in 2010. These are for my son's scrapbook, so I focused on the papers making him stand out. I ended up choosing four coordinating prints from Stampin' Up! Tomorrow I will begin work on making it all come together, choosing borders, letters, embellishments, etc.
Friday, May 4, 2012
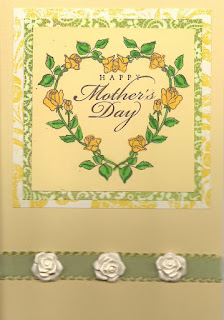
Day 125: Mother's Day Rose Heart Wreath Card in Yellow
I have to hurry up and get my Mother's Day cards made. Everyone lives in different states, so I need to get these made and in the mail. I made this yellow one for my mother-in-law, as yellow is her favorite color.

Thursday, May 3, 2012
Day 124: Blue Ballerina Dance Recital Card
Yesterday I made the ballerina for this card. Today I used Pacific Point designer paper and card stock from Stampin' Up! to finish the card for my niece's dance recital.


Wednesday, May 2, 2012
Day 123: Blue Ballerina
Tonight I stamped and colored a ballerina with the Ballet Dancing Doll Stamp from Limited Edition. I used Copic markers to color the doll in blues, as this card is for my niece's ballet recital, and blue is her favorite color. It is late, so I am going to bed and will finish this tomorrow.
Tuesday, May 1, 2012
Day 122: May Day Baskets
Today is May 1st, the day to secretly hang flowers on the doors of your friends and neighbors. So roll up a sheet of patterned card scrapbook paper into a cone shape, secure it, punch two holes for a ribbon hanger, add some flowers, and leave some pretty surprises for May Day!
Subscribe to:
Posts (Atom)