

Showing posts with label card. Show all posts
Showing posts with label card. Show all posts
Tuesday, November 27, 2012
Day 332: Welcome Baby Card
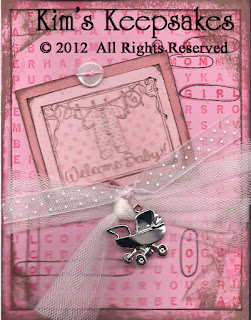
I found out that a friend had a beautiful baby girl tonight, so I had to make a card to include with my gift. I used card stock, inks, and stamps from Stampin' Up! (The rose colored card and dotted pink were in my stash, but they are not SU). I circled the words in the word background that applied to this baby with a journaling pen from Creative Memories. I tied white tulle and a sheer pink ribbon with white polka dots (both from my stash) around the word search, and added a Hallmark baby buggy charm to the ribbon with a pink safety pin from Oriental Trading Company. I used some Scrapper's Floss (Karen Foster) to "tie" on the pink button (my stash).


Monday, November 26, 2012
Day 331: Nine Piece Christmas Quilt Card
Tonight I was looking to make a really quick Christmas card, so I cut some scraps of nine different Christmas papers into 1.25 inch squares, punched out a square of 1.50 inches as a pink background, and adhered them all to a pretty green card stock. Christmas papers by K & Co. Plain card stock by Stampin' Up! Polka Dot ribbon by Oriental Trading Company.


Friday, November 23, 2012
Day 328: Holy Triptych Christmas Card Day 2
Today I used Smooch Accent Ink in gold and silver to highlight the gifts of the wise men, the star and halos, and the angel's wings. I also cut out all the sections of the triptych.
Thursday, November 22, 2012
Day 327: Holy Triptych Christmas Card Day 1
Tonight I stamped and colored images using Stampin' Up's Holy Triptych nativity set. I stamped the images on Neenah paper, using Memento inks and my Stamp-A-Ma-Jig to line them up, and then I colored the images with Copic markers.
Tuesday, November 6, 2012
Day 311: Sympathy Card
Unfortunately, the mom of one of my daughter's friends died yesterday, so tonight I helped her to make a sympathy card. I showed her how to use the Cuttlebug embossing folder, how to use the Stamp-A-Ma-Jig to position her stamps where she wanted them, and how to use Copic markers to color the praying hands image (Dollar Tree; all other images and verses shown, card stock: Stampin' Up!). Inks: Brown: Memento and Silver: Colorbox. My daughter selected the card stock, embossing folder, and all the stamps and inks used. Hopefully this card will help lift her friend up after the sudden and unexpected death of her mother.


Thursday, November 1, 2012
Day 306: Day of Gratitude Thanksgiving Card
I have been making Thanksgiving cards using the Day of Gratitude stamp set and coordinating designer paper from Stampin' Up! and using a technique I learned on Meg Loven's blog. Today I got all of the stamped images cut out; cut and scored card stock (Recollections by Michael) for the card bases; and stamped the inner verse on all the cards I plan to send for Thanksgiving. (That felt pad is still able to be used on day three of this project!!) I will spend time tomorrow assembling more of the cards.
Wednesday, October 31, 2012
Day 305: Day of Gratitude Thanksgiving Card Version 2
I have been making Thanksgiving cards using the Day of Gratitude stamp set and coordinating designer paper from Stampin' Up! and using a technique I learned on Meg Loven's blog. I was able to get three more cards made today in between all the other busy-ness of Halloween! A few subtle variations in the colors on the flower image today. And how cool that I left the felt sitting on my desk overnight and was still able to use it today!


Tuesday, October 30, 2012
Day 304: Day of Gratitude Thanksgiving Card Version 1
I was googling ideas for using the flower image from the Day of Gratitude stamp set and the matching designer paper by Stampin' Up!, and came upon Meg Loven's September 8, 2010 blog post. She described how to make custom felt pads using a piece of regular felt, an absorbent tile, and re-inkers. I thought it was such a neat technique, I decided to try it, and this is the result:


Monday, October 29, 2012
Day 303: One Moment in Time Gears Card Part 2
I punched gears and circles out of brushed silver card stock by Stampin' Up! I used my Stamp-A-Ma-Jig and rich cocoa Memento ink to stamp the pocket watch (Rubber Stampede) and the verse (Repeat Impressions) onto the silver card . I ran everything through the Xyron machine, then attached the pieces to the front of my card. The inside verse I wrote says: Your birthday only comes once a year, so Celebrate!


Sunday, October 28, 2012
Day 302: One Moment in Time Gears Card Part 1
I need some men's cards for upcoming birthdays. I started out with intentions of making an entirely different card, but when I was looking for an embossing folder to use as a background, I came upon this Tim Holtz gears embossing folder, and changed my mind completely! I used kraft cardstock by Recollections (Michael's), ran it through my Sizzix Big Shot machine, then used a Ranger silver paint dauber and Ranger chocolate distress ink to highlight the embossed areas. I got enough backgrounds done to make 8 embossed card bases, but will need to finish working on these tomorrow.
Wednesday, October 24, 2012
Day 294: Jesus is the Reason Card
I needed to make a quick card to enclose with an early Christmas present for my parents. I chose to use this stamp from Paper Inspirations as the main sentiment. I stamped it on craft card stock (Recollections by Michael's) in red StazOn ink, added some paper with the names of Jesus on it (Hobby Lobby), and added a burgundy ribbon from my stash. A quick but meaningful card.


Tuesday, October 23, 2012
Day 293: Merry Christmas Train Card
Tonight I was looking to make a really quick card and use up some bits and pieces I had. I cut a card base from Stampin' Up! card stock, and on top of it I layered a piece of upcycled clear packaging that I had embossed with the Cuttlebug snowflake embossing folder, then I added a bit of Merry Christmas ribbon (Oriental Trading Company), and a train and snowflake from Jolee's. Does this make a cute card or what?!


Wednesday, September 26, 2012
Day 267: Penguin Card
Today I made this cute birthday card for a little girl whose birthday party theme is penguins. The party hat and "top note" dies are from Sizzix. Punches from EK Success were used to make all the punched shapes. All card stock by Stampin' Up!


Saturday, August 11, 2012
Day 223: Anniversary Card
I continued to make the remaining anniversary cards I needed, using the roses from the Elements of Style stamp set and Rich Razzleberry inks, all from Stampin' Up! See Day 222 for photo.
Thursday, August 9, 2012
Day 221: Monster Truck Card
My husband and I are very close with my husband's cousin, and her teenage son has a birthday coming up. I decided a monster truck card might be considered "cool".
I used "chocolate chip" card stock from Stampin' Up! as the card base. I ran a piece of brown leather look paper from my scrap folder through Cuttlebug's "tire track" embossing folder. I stamped the Great Impressions monster truck stamp with Memento Ink on Neenah paper, and colored it with my Copic markers. I cut out the truck and used pop dots to adhere it to the tire tracks. I layered that on top of a "sand" paper in my scrap folder. I used my Crop-A-Dile and added 5 black eyelets across the top and bottom of the card to rev it up a little bit.

I used "chocolate chip" card stock from Stampin' Up! as the card base. I ran a piece of brown leather look paper from my scrap folder through Cuttlebug's "tire track" embossing folder. I stamped the Great Impressions monster truck stamp with Memento Ink on Neenah paper, and colored it with my Copic markers. I cut out the truck and used pop dots to adhere it to the tire tracks. I layered that on top of a "sand" paper in my scrap folder. I used my Crop-A-Dile and added 5 black eyelets across the top and bottom of the card to rev it up a little bit.

Sunday, July 22, 2012
Day 203: Thank You For Being A Friend
Our pastor preached about friendship today, and it got me thinking that I needed to let my friends know that I appreciate their friendship. I made about 15 of these cards tonight. All papers, stamps, and inks from Stampin' Up!


Monday, July 16, 2012
Day 197: Birds Sympathy Card
Unfortunately, I had to make a sympathy card tonight. The birds stamp is from Just For Fun. All other stamps, paper, ribbon, and punches used are from Stampin' Up!


Sunday, July 15, 2012
Day 196: Cherish Anniversary Card
The punch and all stamps, card stock, and ink used to make this card are from Stampin' Up! The stamp set used is called "Baroque Motifs". I used Garden Green ink to stamp the swirled vine on to Very Vanilla card stock. I then used Purely Pomegranate and Cameo Coral to randomly stamp flowers on the vines. I used my Stamp-A-Ma-Jig to align "Cherish" along two sides of the flowers and vines. I used my ticket punch on each corner of the Very Vanilla card stock. I layered this on to Cameo Coral card stock and then on to a base of Garden Green card stock. This design was inspired by a card I received from a lady in my stamp club, so thank you MF.


Friday, July 13, 2012
Day 194: Curious George Birthday Card
I made this cute Curious George card for my nephew who will be turning two in a few weeks. I used Curious George paper from a kit by Blue Sky Designs and Real Red card stock (Stampin' Up!) as the base of my card. I used a piece of yellow fun foam as a base for a rectangle of the Real Red (SU) card stock and the Curious George punchout (BSD). I added that on top of the card base. Yellow ribbon and two red brads add the finishing touches.


Wednesday, July 11, 2012
Day 192: Just Flying By...
I was inspired by the airplane card my son made for his dad yesterday to create this "Just Flying By..." card for my teenage nephew. I used card stock from Stampin' Up as my background for the sky and as the card base. I used masking to make it look like the clouds (All Night Media) were in front of or behind the hot air balloons (Commotion Rubber Stamps) and the plane (unknown). I used a cotton swab to pick up ink off my Stampin' Up! Craft White ink pad and swirled it inside the outlines of the clouds to make them look fluffy and airy. I colored the hot air balloons with my Stampin' Write markers. I used Martha Stewartink on a cotton swab to color the plane silver. I layered the sky scene on top of a gingham plaid photo frame I had in my stash and backed it with some white mulberry paper (Paper Reflections). I made the "Just Flying By" banner by using my square punch diamond style on each end of my rectangle. I wrote "Just Flying By..." with a silver gel pen from Marvy, then wrote over that will a sparkly turquoise Gelly Roll pen (Sakura). I made another banner and continued the sentiment on the inside with "To Wish You a Happy Birthday!". I added a green metal swirl (Creative Impressions) as an accent on the left side of the card. Finally, I used Crystal Effects from Stampin' Up! on the airplane to bring it into the foreground and give the card some dimension. I allowed it to dry completely before scanning it to share with you.


Subscribe to:
Posts (Atom)