
Showing posts with label Repeat Impressions. Show all posts
Showing posts with label Repeat Impressions. Show all posts
Monday, December 10, 2012
Day 345: Stamping Ornaments
Tonight I used the ornament stamp from Repeat Impressions and some Stampin' Up! images to make "ornaments" to embellish cards.


Saturday, December 1, 2012

Friday, November 30, 2012

Monday, October 29, 2012
Day 303: One Moment in Time Gears Card Part 2
I punched gears and circles out of brushed silver card stock by Stampin' Up! I used my Stamp-A-Ma-Jig and rich cocoa Memento ink to stamp the pocket watch (Rubber Stampede) and the verse (Repeat Impressions) onto the silver card . I ran everything through the Xyron machine, then attached the pieces to the front of my card. The inside verse I wrote says: Your birthday only comes once a year, so Celebrate!


Thursday, May 24, 2012
Day 145: Father's Footprints Father's Day Card
In order to create this card, I used the following images from Repeat Impressions: 4028-H, "The journey of life . . ."; 2720-G, "Left Boot Print"; and 2721-G, "Right Boot Print". These were my main images on this Father's Day card I created for my Dad. When I was a little girl, my sister and I always untied my Dad's work boots when he got home. When I saw those boot prints, I knew I had to make a Father's Day card for him. I used some "dirt" paper as my background for the boot prints and for the "journey" quote. I used my Crop-O-Dile to add gold eyelets in each corner of the dirt. I used a map from an atlas with my home town on it as a background. My Dad was a truck driver and the map ties in well with the "journey" quote. I felt like the card needed something else, so I used a compass stamp from Stampin' Up! (SU). I punched it out and mounted it on a couple of different sized circles, used my double slit punch (SU) to thread some ribbon through and then adhered an antique brad (SU). I mounted it all on Chocolate Chip card stock (SU).

Friday, May 4, 2012
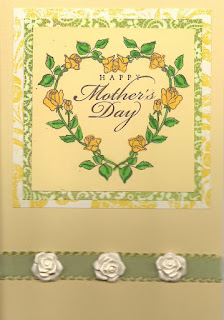
Day 125: Mother's Day Rose Heart Wreath Card in Yellow
I have to hurry up and get my Mother's Day cards made. Everyone lives in different states, so I need to get these made and in the mail. I made this yellow one for my mother-in-law, as yellow is her favorite color.

Monday, April 30, 2012
Day 121: Mother's Day Rose Heart Wreath Card in Blue
I made another Mother's Day card (see Day 115 for product information) in blue for my sister for Mother's Day. Hope you aren't reading my blog today, Sis!!

Wednesday, April 25, 2012
Day 116: Mother's Day Card Inside Sentiments
Tonight I finished the interior of my mother's day card. I used a Mother verse (unknown manufacturer) and Always Be Grateful from Repeat Impressions as my sentiments. I used my Stamp-A-Ma-Jig to place my stamps accurately. Some of my stamp did not get inked, so I decided to just go over all the text with a Stampin' Up! stamp and write marker. It gives it a handwritten look, which on a card to my own mother is a nice touch.


Tuesday, April 24, 2012
Day 115: Mother's Day Card
I began designing my Mother's Day card for the most important mom in my life....mine!! I used Rose Heart Wreath Frame from Repeat Impressions as my focal image. I stamped it on Pretty in Pink paper from Stampin' Up! and colored it with Copic markers. I used my Stamp-A-Ma-Jig to position the Happy Mother's Day sentiment from Stampin' Up! in the center of the Rose Heart Wreath Frame. I then layered it on a green lace paper from Basic Grey and a rose paper from Echo Park Paper Co. I cut a piece of Regal Rose card stock to use as my card base. I added a pink ribbon from Big Lots and 3 rose embellishments from Stampin' Up! to pull it all together.


Monday, April 16, 2012
Day 107: Lovely as a Tree Sympathy Card
Unfortunately, the husband of my friend and Stampin' Up! demonstrator died, so I needed to make her a sympathy card. One of her favorite Stampin' Up! stamp sets is Lovely as a Tree, so I decided to use one of the images from that stamp set on the front of the card. I used a paper that gradually changed tones from Anna Griffin as the background for the tree image and for the background for the inside sentiment. I heat embossed the image of the trees using VersaMark and clear embossing powder from Stampin' Up. The sentiment "Remembering with you the life of someone dear." is from Repeat Impressions, and was stamped with Old Olive ink from Stampin' Up!. I used one of the labels from Cuttlebug's Fanciful Labels Embossing Folder Plus and my Sizzix Big Shot machine to make the label for the sentiment. I added gold brads to the label, highlighted the raised parts of the label with Old Olive ink from Stampin' Up!, and ran a sheer green ribbon behind the label to dress up the front of the card. I layered the stamped image and the label on top of a striped paper from a Stampin' Up! designer paper collection, and then layered all of that onto a piece of Stampin' Up! Old Olive card stock. On the inside of the card, I stamped a sentiment from Great Impressions: "What a beautiful difference a single life made." I then die cut and embossed two more labels on Old Olive card stock from Stampin' Up! to frame out the sentiment on the inside of the card.


Saturday, April 14, 2012
Day 105: Indexing Unmounted Rubber Stamps on Wood Mounts How To
I have several unmounted rubber stamp images that I need to mount on wood blocks, so I decided to work on that project today. I began mounting images when I was on the design team for Repeat Impressions. Wendy would send us unmounted stamps to use in our designs because she could send us several images for a low rate of postage. I do not like using acrylic blocks, however, so I found someone on ebay who sold wood mounts and bought a box of assorted sizes. By using a dot runner adhesive on the back side of the unmounted rubber stamp image, I can attach the unmounted rubber onto a wood mount, ink up the image with StazOn ink, and then stamp on top of another wood mount, thus making an index on the front side of the stamp. I got all of my index images stamped today and will attach the cushion and rubber to the wood mounts tomorrow.
Sunday, March 25, 2012
Day 85: Ode To Spring Easter Cards, Continued
I used my Big Shot die-cutting machine and the oval scallop frame die by Sizzix to cut an oval around my stamped image ("Ode to Spring", by Repeat Impressions) and to make a scalloped oval border (paper by Stampin' Up!) to frame the image. I guess I could have just folded my card and stamped right on the card and added the border after, but I had originally thought I would use a floral patterned paper behind the stamped image. Then last night when I was in bed, I thought about using the scalloped oval frame to highlight the rabbit. It sort of looks like you are peeking through an Easter egg. I think these cards turned out really cute and I can't wait to give them to my family at Easter.


Saturday, March 24, 2012
Day 84: "Ode to Spring" Easter Cards
Tonight I started to work on my Easter cards. I am using "Ode to Spring" by Repeat Impressions (http://www.repeatimpressions.com/images/2605.gif ) as my focal image for my cards. I covered the flowers with painter's tape and used VersaMark on the rabbit portion of the stamp, wiped off the painter's tape with an alcohol wipe, and then stamped onto white cardstock. I then poured a pastel embossing powder (Stampin' Up!) over the VersaMark rabbit image. Despite having the painter's tape on the flowers, embossing powder still wanted to collect where the flowers were supposed to be. I just used a sponge paint brush to brush off the embossing powder in the areas where I didn't want it. Then I heat embossed the rabbit. Using my Stamp-A-Ma-Jig to line the images up, I then over-stamped the flowers in brown Memento Ink, and colored the flowers with Copic markers. Tomorrow I will finish the cards.

Sunday, March 18, 2012
Day 78: Get Well Card
Tonight I stamped a wishing well (Sweet Impressions) on Neenah paper, then colored with Copic markers and Koh-I-Noor pencils. The darker wishing well was colored with the Copic markers, the lighter one was colored with the Koh-I-Noor pencils. I used gelly roll pens by Sakura to add some shine and glitter to the water and the roses on the cards. I used an argyle embossing folder (Cuttlebug) and tried to do the same heat embossing that I learned at the Stamp Scrap Art Tour workshop, but I had trouble getting results I was happy with. I used the same technique, so either my VersaMark is old, or maybe it is the Cuttlebug embossing folder. I do recall the instructor saying she found the Sizzix folders a little easier to work with for this technique. I stamped "Get Well Soon" (Repeat Impressions) on a scrap of yellow paper (all papers by Stampin' Up!), added a couple of eyelets and used foam tape (Scotch) to add dimension to the wishing well and to the sentiment.
Any comments on which wishing well you like better? I think I prefer the lighter one, which was done with the Koh-I-Noor pencils. The one with the Copic markers is a little dark; however, I don't have all that many Copic markers yet. Maybe when I get a few lighter colors, I will be able to create lighter images with the Copic markers.
This is not one of my favorite cards I have made...still needs to be tweaked, but I'll get it figured out.


Any comments on which wishing well you like better? I think I prefer the lighter one, which was done with the Koh-I-Noor pencils. The one with the Copic markers is a little dark; however, I don't have all that many Copic markers yet. Maybe when I get a few lighter colors, I will be able to create lighter images with the Copic markers.
This is not one of my favorite cards I have made...still needs to be tweaked, but I'll get it figured out.


Saturday, March 10, 2012
Day 70: Stamp Scrap Art Tour: Day 2
Yesterday we made lots of goodies. Today we shopped....and shopped....and shopped till we dropped! I purchased stamps and supplies from: Tessler Stamps, Seaside Stampin' Ink, Peddler's Den, Rubber Cottage, Repeat Impressions, Darcie's, Endless Creations and Everyday Cards, Just For Fun, and Morning Star. (If you are looking for nice, Christian rubber stamps, Morning Star has a wonderful selection.)
The first 100 people at the door of the show received a key to a treasure chest for a chance to win $100 in Tour Bucks to spend at the show. I arrived at 8:10 AM (doors opened at 10 AM, but since we had spent the night at the hotel that was hosting the show, when I woke up early, I decided to go sit by the doors). I was number 3 in line. I called Denise and Lisa's room and told them to come get in line. We all got keys for the treasure chest, but unfortunately, none of them worked. There were six more chances to win $100 throughout the day, but none of us won those either.
At each show on the Stamp Scrap Art Tour, there is a charity raffle that supports Shriner Hospitals for Children. The winner gets a basket of up to $500 retail value. We each purchased $10 in tickets, and,
drum roll....the winner was....ME!! Denise and Lisa started screaming and pointing at me when my name was called! It was a lot of fun looking at all the goodies in that basket on the way back home! Many thanks to all the vendors that contributed to the basket and especially to Darcie's*, which contributed the vast majority of the stamps in the basket.
*Darcie's: www.darciesllc.com
Here are three items from Friday's Make and Take that needed to get completed at home, so I finished them tonight:
 |
| Stamps and Card Design by Art Gone Wild (I think) |
 |
| Stamps and Card Design by Seaside Stampin' Ink; I added the lighthouse and shells from Buttons Galore when I got home because I thought the card needed something else |
 |
| Box, Stamps and Design |
 |
| by Repeat Impressions |
 |
| of Freeport, Maine |
Wednesday, February 9, 2011
Instructions: LOCKEbiliTy Victorian Fan for Repeat Impressions

There has been a request for instructions on how to make the Victorian fan I posted on April 1, 2009.
The LOCKEbiliTy stamp has 4 panels, 3 with places for photos, and 1 that flips up to make the locket cover (see diagram below). Using the middle photo panel and the locket cover panel (which is directly underneath the middle photo panel), I made one long strip for each blade of the fan. Using a brush tip marker, I inked the scroll design and the edges of the middle photo panel and the locket cover panel. I did not ink the dividing lines between the photo panel and the locket cover panel in order to achieve the long blade shape I wanted.
 LOCKEbiliTy stamp panels
I sponged some brown ink onto the blades to give them an aged look. I added my photos and then stamped the quotes from Repeat Impressions Legacy Text series. I added a coordinating patterned paper to lengthen the fan blades, and covered the seam on each blade with lace. I stacked the fan blades one on top of the other, and made a hole with a paper piercer, and inserted a brad in the hole. I then spread the fan blades out into an arc shape. When I liked the effect, I carefully turned the fan over. Using the size of my lace as a guide, I used double sided tape on the back of each fan blade to attach two rows of lace to the back of the fan. You do want to leave a little give in the lace so that it will close if you choose to fold it up.
I am sorry I cannot be more specific with lengths of the fan blades or the lace. I am writing these directions on memory alone. I made this fan almost two years ago and I no longer have it. I sent it to Wendy when I was on her design team. If you attend Stamp Scrap Art Tour, she may have it on display and you can see it up close. See Repeat Impressions website http://www.repeatimpressions.com/ and look under conventions to see when they will be in a city near you.
Friday, January 9, 2009
A New Year Means New Designs for Repeat Impessions
Happy 2009!!
Believe it or not, I was busy making Valentine's Day and Easter cards for Repeat Impressions before Christmas arrived!!
Our cards were due to RI by January 16, and since we went home to northern NY for two weeks over Christmas, I wanted to have my cards ready to put in the mail.
Here are the cards. Vote in my poll and tell me which one you like best!!
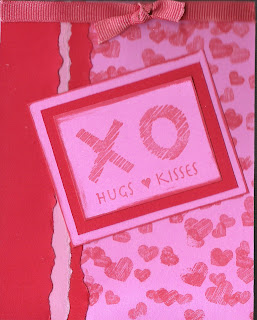


It is hard to believe that Valentine's Day will be here in about a month!! I have to get busy making some valentines for the special people in my life.
Believe it or not, I was busy making Valentine's Day and Easter cards for Repeat Impressions before Christmas arrived!!
Our cards were due to RI by January 16, and since we went home to northern NY for two weeks over Christmas, I wanted to have my cards ready to put in the mail.
Here are the cards. Vote in my poll and tell me which one you like best!!


It is hard to believe that Valentine's Day will be here in about a month!! I have to get busy making some valentines for the special people in my life.
I am teaching a paper bag scrapbook class, an explosion box scrapbook class, and a family record album class at the Washington Park District this winter. If you live in or near Washington, Illinois, come take a scrapbook class with me!!


Wednesday, November 19, 2008
How To Make a Paper Bag Calendar
What's New
I have been really busy lately...sorry I haven't been keeping up with the blog.
I did pretty well at the craft shows in Metamora and in Washington. It is always a lot of fun to see who it is that purchases the items I have made. (Of course, I probably spend a good portion of my profits buying items from other crafters, but that is part of the fun!)
I have been scrapbooking some of D's photos...from my sister's wedding in 2007, karate, and his birthday. I have made a football scrapbook and two Christmas albums for my booth at Holiday Presence. I was pleased that my autumn scrapbook and shades of winter scrapbooks sold last month. I hope whoever bought them is enjoying them.
I taught a paper bag calendar class and a Christmas tag class last week. Everyone had lots of fun. I enjoy teaching others. It is fun to see the expressions on their faces when they create something they thought perhaps they could not.
My gallery at Repeat Impressions has been updated now. Stamps are 20% off this month, so if you are making Christmas cards, order now!!
How to Make a Paper Bag Calendar
Paper bag calendars are a good way to write down the everyday kinds of things you and your family do, as well as a way to focus on a few special events each month. You can purchase 6" x 12" paper bags at Kmart (American Fare brand). You will need 7 paper bags to make a calendar for one year. Fold the paper bags in half, and glue a 6"x 6" piece of paper on top of each page of the paper bag. (One paper bag will yield 4 pages.) You will use two pages for each month of the year. You can print out a calendar for each month from a software program or even from a website. Make it small enough to fit on your page. Attach the calendar on the sides and bottom only. Leave the top portion unglued so you may slip a blank tag into the "pocket" the calendar makes. You can use the tag to journal about special events that happen each month. On the second page for each month, make another pocket with a piece of card stock and add a tag. You can make or add as many tags as you want or need for each month. When you get to December, you will find that there are still three pages available to be covered. You can either make a "notes" section, or just glue the second and third pages together, and then you will just have to glue paper on to the back cover of the calendar. Leave the tops of the paper bags unglued and you will have storage places for your pictures, event tickets, etc. It will be a great way to document your year and a joy to look back on in the years to come.
Friday, October 17, 2008
More Creations for Repeat Impressions

This is a home decor piece I made using Repeat Impressions stamps. The verse reads "Let Heaven and Nature Sing".

I was kind of stumped by how to make this lamp post the focal point of the card. It lacked dimension. Adding the ribbon for a bow gave it the oomph I was looking for.

Santa praying over the Christ child is one of my favorite images. I was so excited to find that Repeat Impressions has a stamp with this image!!

Gotta love those snow angels!!

I love the purple and turquoise color combos for this card!

This one took the most time (and the most glitter) of all the cards I made for the Repeat Impressions Design Team Challenges. I think the layers of vellum and glitter and the pastel colors make this a sweet take on the Christmas season. The verse reads "It is Christmas in the heart that puts Christmas in the air".
I know it's a little early, but I wish you all "Happy Holidays!" (works for everything from Halloween till New Year's!)
Thursday, October 2, 2008
Using Watercolor Crayons on Stamps
I tried a technique I read about in Vamp Stamp News: using watercolor crayons from Stampin' Up! directly on the stamp, then misting the colored stamp with water and stamping the image. It took a few attempts to get the correct amount of mist on the colored stamp to get a good strong image, but I think I know what I am doing now! I think this is going to be one of my favorite techniques.
I used this technique to make this card for the fall Repeat Impressions Design Team Challenge:

I used this technique to make this card for the fall Repeat Impressions Design Team Challenge:

Subscribe to:
Posts (Atom)